USING THE ENLARGER
Never operate the enlarger - or any other electrical equipment - with wet hands
Do not put damp trays on the enlarger bench - which must be kept dry at all times
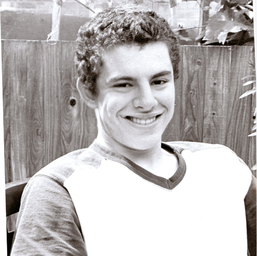
COMMENT ON ENLARGEMENT:
- IS0 400 Film - Test Strip at 40 second exposure
- Quite a grainy enlargement
- In order to reduce an unsightly background, the printer revealed too much t-shirt
- A lucky photograph of an unco-operative and reluctant subject - i.e. my son!
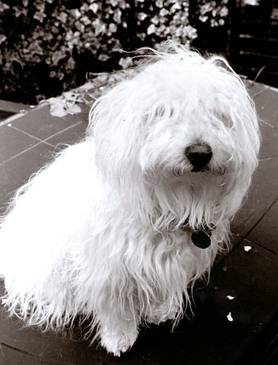
COMMENT ON ENLARGEMENT:
- ISO 400 Film - Test Strip at 20 second exposure
- Not so happy with the positioning of the puppy - the corner of the table peaks at the top of the puppy's head
- Too bright on the left side of the body ... needs burning-in
- A 10 second exposer, whilst probably too bright, would have revealed the writing on the puppy's disc
- Clean the lens carefully with a soft brush and a piece of tissue.
- Remove the negative carrier and clean with blow brush, and wipe off fingerprints if a glass negative carrier.
- Place the selected negative in the carrier - shiny side up - and check again for dust - which should be blown away.
- Place the carrier into the enlarger and when done, switch on the enlarger.
- Centre the frame under the enlarger and adjust to the chosen size of the print.
- Open the enlarger lens to its maximum aperture (to give the brightest possible image).
- Focus the image roughly, then raise or lower the enlarger head.
- Adjust the focus control on the enlarger until the image appears perfectly sharp. The image size may change at this point, so gradually raise or lower the enlarger head until the image size is once more correct.
- Fine-tune the focus. If using a focus magnifier, be sure that a sheet of print paper is on the board to assist in the focusing.
- Dial in or place in the filter (for normal grade paper (2), the dials should be Yellow at 41 and Magenta at 32.
- Close the enlarger lens down at least two stops below its maximum, to ensure the image is as sharp as possible.
MAKE A TEST STRIP
- Don't enlarge without a filter. If a filter cannot be found - use something close to 2 - i.e. 1.5 or 2.5.
- A number 2 filter can change the contrast without changing the times. This filter affects two layers of the multigrade sheet of paper - 1 layer is blue and other is green and number 2 reaches both.